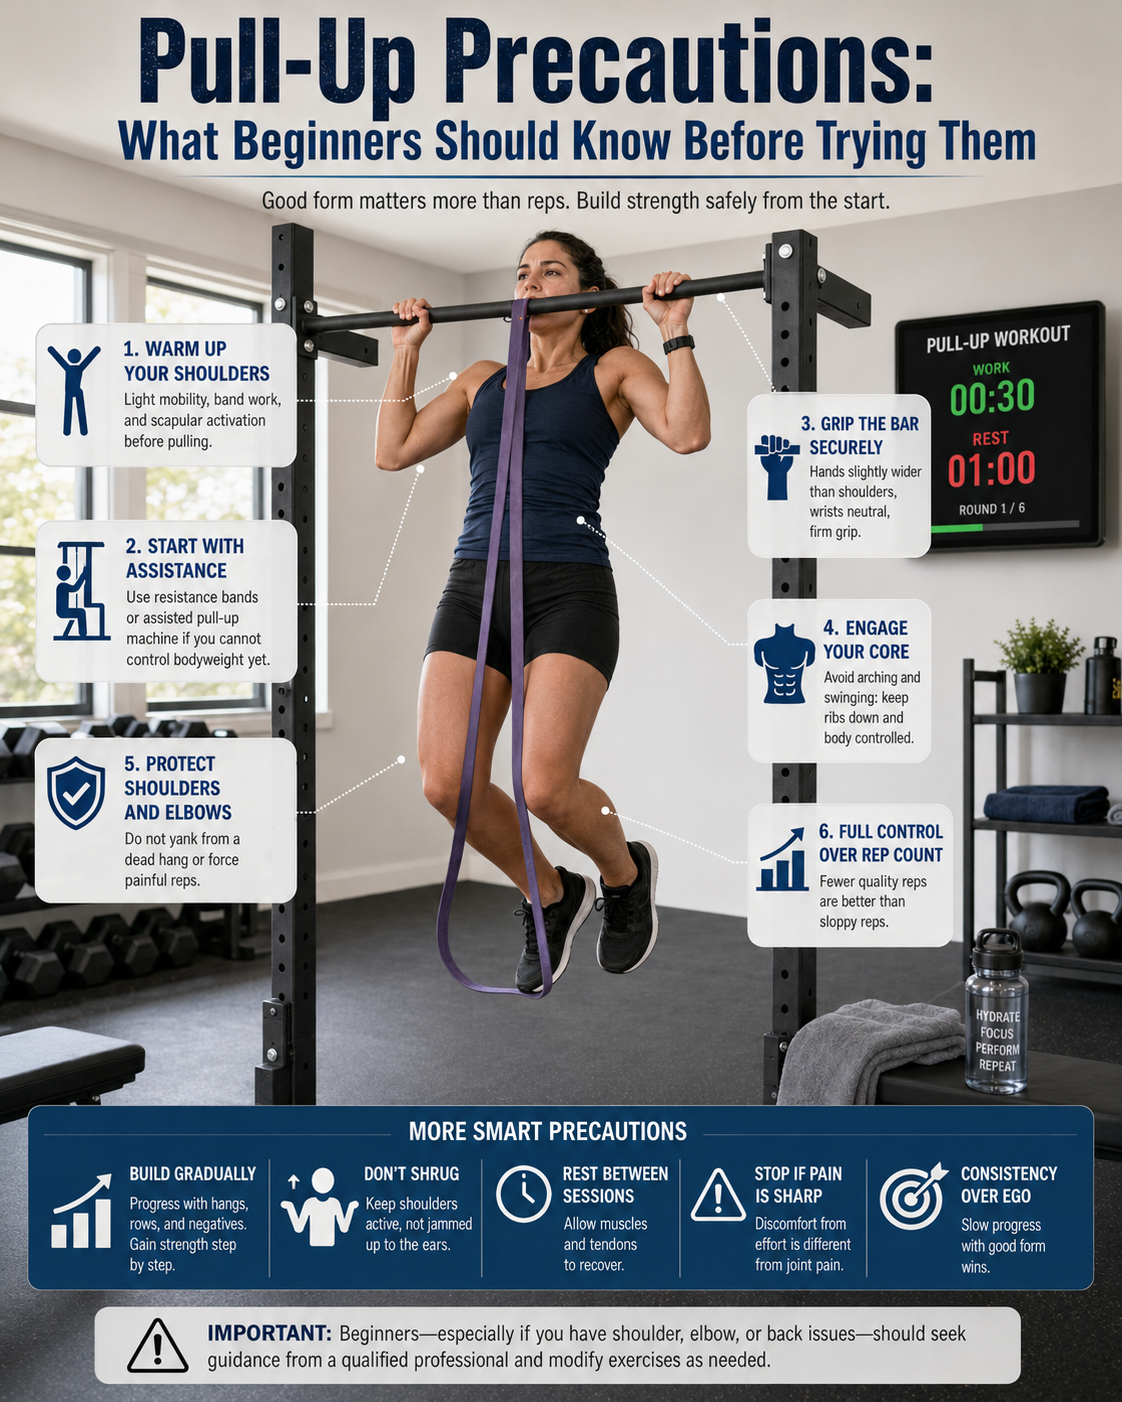
Pull-Up Precautions: What Beginners Should Know Before Trying Them
Minjin Park
·
Pull-ups have a reputation for being one of the ultimate bodyweight exercises. They look clean, impressive, and simple: hang from a bar, pull your body up, lower yourself back down. That is it.
But for beginners, pull-ups can feel surprisingly difficult. Even people who are active in other workouts may struggle to do one full rep. That does not mean you are weak or “not built” for pull-ups. It simply means pull-ups require a specific combination of grip strength, shoulder control, back strength, core tension, and practice.
Because pull-ups use your shoulders, elbows, wrists, back, and hands at the same time, they are also an exercise worth approaching carefully. Jumping straight into full pull-ups before your body is ready can lead to sore elbows, irritated shoulders, strained hands, or frustrating form habits that are hard to fix later.
The good news is that you do not need to start with perfect pull-ups. In fact, most beginners should not. There are safer, smarter ways to build up to them.
This guide covers the most important pull-up precautions beginners should know before trying them, including shoulder control, grip, assisted options, progression, and how to avoid common mistakes.
A pull-up is not only an arm exercise. Many beginners think the goal is to pull with the biceps as hard as possible, but a proper pull-up uses much more than that.
A pull-up mainly works:
Upper back
Lats
Biceps
Forearms
Grip muscles
Rear shoulders
Core
Muscles around the shoulder blades
Your arms help bend the elbows, but your back and shoulder blades play a huge role. If you rely only on your arms, the movement may feel impossible or uncomfortable.
A good pull-up starts with control through the shoulders and upper back. The body stays steady, the grip is secure, and the movement is smooth. It is not just a desperate pull toward the bar.
Before chasing your first full rep, it helps to understand that pull-ups are a skill. You are training coordination, not just strength.
Check Whether Your Shoulders Are Ready
Your shoulders need to move and stabilize well during pull-ups. If your shoulders feel stiff, pinchy, unstable, or painful when you hang from a bar, full pull-ups may not be the best starting point.
This does not mean you should avoid training forever. It means you may need to build shoulder control first.
Before trying pull-ups, ask yourself:
Can I raise my arms overhead without pain? Can I hang lightly from a bar without sharp discomfort? Can I control my shoulder blades? Can I keep my ribs from flaring when my arms are overhead? Can I lower myself slowly from a raised position?
If the answer is no, start with easier pulling exercises and shoulder mobility work. Pull-ups place a lot of demand on the shoulders, especially at the bottom position where the arms are fully overhead.
Pain is not something to push through. Muscle effort is normal. Sharp shoulder pain is not.
Learn the Difference Between Passive and Active Hanging
Hanging from a bar may seem basic, but there are two very different ways to hang.
A passive hang means your body is relaxed and your shoulders rise toward your ears. This can be useful for some people as a stretch, but beginners should not rely on it as their main pull-up position.
An active hang means your shoulders are engaged. Your shoulder blades gently move down and back, your neck stays long, and your body feels controlled.
A simple active hang practice:
Grip the bar. Let your feet touch the floor or use a box if needed. Start in a relaxed hang. Gently pull your shoulders away from your ears. Keep your elbows straight. Hold for a few seconds. Relax and repeat.
This teaches your body how to stabilize before pulling. It also helps you feel the difference between hanging loosely and creating strength through the upper back.
For many beginners, active hangs are one of the most useful first steps toward pull-ups.
Start with Assisted Options
A full bodyweight pull-up is a big jump for most beginners. Assisted options let you practice the movement with less load.
These exercises are not “cheating.” They are how you build the strength and control needed for full pull-ups.
The best assisted option depends on your current ability. If you cannot hang comfortably yet, start with lat pulldowns or inverted rows. If you can hang but cannot pull up, use a band, machine, or box support.
A good progression should make the movement challenging but clean. If you are kicking, twisting, or straining your neck, the assistance level is probably too difficult.
Be Careful with Resistance Bands
Resistance bands can help beginners, but they need to be used carefully. A band stretched under your foot or knee stores tension. If it slips, it can snap upward suddenly.
When using a band:
Choose a band in good condition
Secure it properly around the bar
Step into it carefully
Keep control when getting in and out
Avoid letting it pull you into awkward positions
Do not rush the setup
Check for cracks or worn spots before use
Bands also give the most help at the bottom and less help near the top. This can be useful, but it means the movement may still feel difficult near the bar.
If bands make you nervous or unstable, use an assisted pull-up machine or feet-assisted variation instead.
Protect Your Grip
Grip is a major part of pull-ups. If your hands cannot hold the bar securely, the rest of the movement becomes harder and less safe.
Beginners often underestimate grip fatigue. Your back may feel fine, but your hands may start slipping halfway through a set. This can lead to sudden dropping, swinging, or overgripping.
Start with short hangs. Build your grip gradually.
Helpful grip precautions:
Use a bar that is not too slippery
Dry your hands before gripping
Avoid overdoing high-volume hanging at first
Stop before your grip completely fails
Keep your wrists in a comfortable position
Do not grip so tightly that your forearms burn immediately
Some calluses may form over time, but ripped skin is not a badge of honor. If your palms start tearing, stop and let them heal.
Chalk can help in some gyms, but always check whether it is allowed. Gloves are optional. Some people like them, while others feel less connected to the bar.
Choose the Right Grip Width
Grip width affects how pull-ups feel. Too wide, and your shoulders may feel strained. Too narrow, and your wrists or elbows may feel cramped.
For many beginners, a comfortable shoulder-width or slightly wider grip is a good starting point. Your hands should not be extremely far apart.
Common grip types include:
Overhand grip: palms facing away
Underhand grip: palms facing toward you
Neutral grip: palms facing each other
A traditional pull-up usually uses an overhand grip. A chin-up uses an underhand grip. Neutral-grip pull-ups often feel friendlier on the shoulders and elbows for many beginners.
If regular pull-ups feel uncomfortable, try neutral-grip handles if your gym has them. Comfort and control matter more than forcing one specific grip too early.
Do Not Start by Kipping
Kipping pull-ups use momentum from the body to help complete reps. They are common in some training styles, but they are not the best starting point for most beginners.
Before using momentum, you should already have good shoulder control, grip strength, and strict pulling strength. Without those foundations, kipping can place extra stress on the shoulders, elbows, and hands.
Beginners should first learn strict control:
Hang steadily. Engage the shoulders. Pull smoothly. Lower with control. Avoid swinging.
Momentum may make a rep look easier, but it can also hide weakness and reduce control. Build the basics first.
Keep Your Body Stable
A pull-up is easier to control when your body is organized. If your legs swing, your ribs flare, and your lower back arches hard, the movement becomes less efficient.
Try to keep your body steady. You can slightly bend your knees if needed, especially if the bar is low. Keep your core gently engaged, your ribs down, and your legs controlled.
Think of your body as one connected unit. The pull should not come from frantic kicking.
A small amount of natural movement may happen, especially when you are learning. But if you are swinging after every rep, slow down and reset.
Lower Yourself with Control
The lowering part of a pull-up is just as important as the pulling part. Many beginners focus only on getting up, then drop quickly back down. This can irritate the shoulders and elbows and does not build as much control.
Lower yourself slowly enough that you stay in charge of the movement. You do not need an exaggerated 10-second descent, but you should not fall from the top.
Controlled lowering helps build strength for future pull-ups. It also teaches your shoulders to stay stable through the full range.
Negative pull-ups are based on this idea. You start at the top using a box or jump, then lower yourself with control. They are useful, but they can also create soreness because the lowering phase is demanding.
Start with a few controlled negatives, not a huge number.
Avoid Overtraining Your Elbows
Pull-ups can be tough on the elbows, especially if you do too much too soon. The tendons around the elbow may become irritated from repeated gripping and pulling.
Beginners may feel this as discomfort on the inside or outside of the elbow. Sometimes it shows up during the workout. Other times, it appears later when gripping, lifting, or straightening the arm.
Your elbows need time to adapt. Pull-up strength is built over weeks and months, not one heroic session.
Warm Up Before Pull-Up Practice
Because pull-ups involve the shoulders, elbows, wrists, and back, warming up matters. Do not walk into the gym, grab the bar cold, and start yanking.
A simple pull-up warm-up may include:
Arm circles
Shoulder rolls
Wrist circles
Light band pull-aparts
Scapular retractions
Easy lat pulldowns
Assisted hangs
Gentle rows
The goal is to increase blood flow and wake up the muscles that stabilize your shoulders.
Warm-ups do not need to be long, but they should be intentional. A few minutes can make your first set feel much smoother.
Use Rows to Build Pulling Strength
Rows are one of the best exercises for beginners working toward pull-ups. They train the back and arms while keeping your feet supported.
Inverted rows are especially helpful. You hold a bar, rings, or suspension trainer and pull your chest toward it while your feet stay on the floor. The more upright your body, the easier the movement. The more horizontal your body, the harder it becomes.
Rows help you practice:
Pulling with your back
Controlling your shoulder blades
Keeping your body stable
Strengthening your grip
Building volume without full bodyweight load
Lat pulldowns are also useful because they mimic the vertical pulling pattern of pull-ups. They let you adjust the weight and focus on clean form.
If you cannot do a pull-up yet, rows and pulldowns are not second-best. They are part of the path.
Progress Gradually
Pull-up progress can be slow, and that is normal. Some people get their first pull-up quickly. Others need months of consistent practice.
Progression might look like this:
First, practice active hangs. Then add scapular pull-ups. Then use rows and pulldowns. Then try assisted pull-ups. Then add controlled negatives. Then attempt partial pull-ups. Then work toward one clean full rep.
Do not skip every step just because you are eager. Pull-ups reward patience.
A clean assisted pull-up is better than a sloppy full pull-up. A controlled negative is better than a painful max attempt. A strong active hang is better than hanging from irritated shoulders.
Do Not Test Your Max Too Often
It is tempting to try for your first pull-up every time you see a bar. But constant max attempts can wear out your elbows, shoulders, and grip without giving enough quality practice.
Instead of testing all the time, train the pieces.
For example, a beginner pull-up session might include:
Active hangs
Scapular pull-ups
Assisted pull-ups
Inverted rows
Light core work
Then, once in a while, test whether you can complete a clean rep.
Progress often comes from boring consistency, not daily all-out effort.
Watch Your Neck and Shoulder Position
When pull-ups get hard, beginners often crane the neck forward, shrug the shoulders, or twist the body to reach the bar. This can create tension in the neck and upper traps.
Try to keep your neck neutral. Look slightly forward or up, depending on the bar position, but do not aggressively stick your chin out.
At the top, avoid forcing your chin over the bar by reaching with your neck. The goal is to pull your body up with strength, not stretch your chin toward the finish line.
If you cannot reach the top without neck strain, use more assistance.
Stop Before Form Breaks Down
Pull-ups are demanding. Once your form starts falling apart, each extra rep becomes less useful and more risky.
Stop your set if:
Your shoulders shrug uncontrollably
Your grip is slipping
Your elbows hurt
You start kicking hard
Your body twists
You drop quickly from the top
You feel sharp shoulder pain
Leaving one or two good reps in reserve is often smarter than forcing a messy final rep.
This is especially true for beginners. Your nervous system and connective tissues are still adapting to the movement.
Consider Body Weight Without Shame
Pull-ups require you to lift your body weight, so they naturally feel different depending on body size and strength. This is not a moral issue. It is just physics.
A heavier person may need more time to build enough pulling strength. A lighter person may find the movement easier but still need shoulder control and grip training.
Do not compare your progress to someone else’s. The goal is to improve your own strength and control.
Assistance is not embarrassing. It is simply a way to adjust the load.
Know When to Ask for Help
If pull-ups consistently cause shoulder pain, elbow pain, numbness, or sharp discomfort, do not keep pushing through. A qualified trainer, physical therapist, or healthcare professional can help you figure out what is going on.
You may need a different grip, better shoulder control, more mobility, less volume, or a modified exercise.
Pain is feedback. It does not mean you failed. It means your body needs a different approach.
Final Thoughts
Pull-ups are a challenging but rewarding exercise. They build upper-body strength, grip, back control, and confidence. But beginners should approach them with patience and respect.
Start with shoulder control. Learn active hanging. Protect your grip. Use assisted options. Build strength with rows and pulldowns. Progress gradually instead of forcing full reps before your body is ready.
A good pull-up is not just about getting your chin over the bar. It is about moving with control, staying stable, and keeping your shoulders and elbows healthy.
You do not have to master pull-ups overnight. Build the foundation first, and the full rep will become much more realistic over time.
Hi, I’m the creator and editor behind ZestyHabit. I research everyday safety, first aid, and practical wellness topics using official guidance and reliable public sources, then turn that information into clear, realistic steps for daily life.
My goal is to help readers make safer, better-informed choices at home and beyond.